Home • Learn to Play Chess • Improve Your Game • Chess History • Chess for Fun • Chess Blog
![]()
Home
•
Learn to Play Chess
•
Improve Your Game
•
Chess History
•
Chess for Fun
•
Chess Blog
| Positional Play in Chess | |
| When there are no tactics, positional play is the main factor. | |
|
What do you do when there are no tactics to consider? You try to strengthen your own position and weaken your opponent's position. To do that, you need to know the elements that distinguish a strong position from a weak one. The center
Engrave this diagram on the portion of your subconscious mind that you use for chess. The center of the chessboard radiates power. Pieces move through the center of the board the way passengers move through the main train station at the center of town. The four squares outlined in green are the true center, but the 12 squares immediately adjacent to them are also important. The 4 x 4 square formed by c6, f6, f3, and c3 is sometimes called the extended center. If your pieces can't occupy the center, the next best thing is that they be within striking distance -- that they can get there as quickly as possible. Every time you make a move, you should consider its impact on the center.
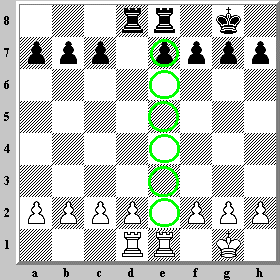
This diagram illustrates the importance of a piece in the center. A Knight in the extended center, like the Black Knight on f6, can move to eight squares (#1 circled). A Knight in the corner, like the White Knight on a1, can move to only two squares (#2). All of the pieces, except the Rook, have better mobility in the center of the board than on the side. As long as it is not on one of the four sides, a King can move to eight squares. It can only move to three squares when in the corner. The possible moves of the Kings are not shown in the diagram, but can be easily counted. Also worth noting is that the King can reach every other square more quickly from the center than from a corner. The Black King on d4 can reach any square on the board in four moves. The White King on h1 can reach no farther than the d-file or the 5th rank in four moves. It will take seven moves to reach a8. In chess a lot of other things can happen in 7 moves. Pawns, as often in chess, are a special case. A Pawn on the a- or h-file, which can only capture on one diagonal, is more limited than a Pawn on any of the other files, which can capture on two. Another limitation of a Pawn on the a- or h-file is that it has almost no chance of ever reaching the center. A Pawn on the b- or g-file has a much better chance. If a Pawn on b2 captures on c3, it already controls the central square d4. By the same logic, a Pawn on the c- or f-file is better, but a Pawn on the d- or e-file, known as the central files, is the best. This is one reason why the rule of thumb when capturing with a Pawn is 'capture toward the center'. Open linesMobility has other applications besides the center. Certain pieces -- Queen, Rook, and Bishop -- are more valuable on open lines than on closed lines. Open lines are ranks, files, and diagonals which are not obstructed by Pawns.
The White Rook on e1 can reach any square between e2 and e7 in one move. This doesn't mean that it's a good idea to move to those squares. Tactics must always be respected. Both Re6 and Rxe7 would lose the Rook for nothing. And still, Black must always consider that White can play either of these moves, and not leave the Pawn on e7 unprotected. From e3, e4, or e5, the Rook on e1 can move along the rank to either the kingside or the queenside. The 3rd, 4th, and 5th ranks are also open lines. The active position of the Rook on e1 contrasts with the inactive position of the Rook on d1. The best that the Rook on d1 can hope for is that White plays the Pawn d2-d4, after which the Rook would be able to go to d2 or d3. That Rook has no chance of reaching d5, d6, or beyond in the near term. The Black Rooks have similar contrasting prospects. The Rook on d8 can slide into the White side of the board in one move, while the Rook on e8 is blocked by its own Pawn. Piece activityThe importance of the center and the importance of open lines have a common characteristic. They both respect the principle that it is better to have active pieces than inactive pieces. Here is an extreme example.
The position in the diagram can be reached in five moves -- 1.e4 h5 2.d4 a5 3.Nf3 Nh6 4.Nc3 Na6 5.Bc4 c6. White has used the first five moves to accomplish many things. The d- and e-Pawns occupy the center and control four central squares (c5, d5, e5, & f5) on Black's side. Their advance has opened diagonals for the two Bishops and created space for the Rooks should they ever move to d1 and e1. he Knights each control two central squares. The white squared Bishop strikes into the Black position, and attacks a sensitive square next to the Black King. Black has used the first five moves to accomplish almost nothing. The Pawns on a5 and h5 perform no useful function, and the Knights have been developed far from the center. Only the Pawn on c6 has any influence on the center, but it is minimal -- Black is unable to play d7-d5 without further preparation. The activity of the White pieces makes a startling contrast to the inactivity of the Black pieces. The game is already lost for Black. The special case of activating the pieces in the opening is called development, but the principle of keeping the pieces active operates throughout the game. Even the King, who spends the early part of the game hiding in a corner, must become active if the game goes on long enough. Pawn structureThe next diagram, like the previous diagram, shows a contrast not likely to be seen in a real game.
The position of the Pawns, ignoring the position of all other pieces, is known as the pawn structure. A good pawn structure is one where the Pawns complement each other. They work together. A bad pawn structure is one where the Pawns fail to complement each other. They work independent of each other. In the diagram, White has a good pawn structure, while Black's is very bad. Strong and weak squaresTo understand pawn structure, you have to understand strong squares and weak squares. Your strong squares are those which your pieces control; your weak squares are those which your opponent's pieces control. Your strong squares are usually your opponent's weak squares, and vice versa. Pawns, more than any other chess piece, have built-in strong and weak squares. Their strong squares are the two diagonal squares where they can capture the opponent's pieces. Their weak square is the square directly in front, which can be occupied unhesitatingly by the opponent's pieces. When the square is occupied, the Pawn can't advance. Consider two Pawns side by side on the same rank, like the White Pawns on d4 and e4 in the diagram. The Pawn on d4 guards e5, which is the weak square for the Pawn on e4. None of Black's major or minor pieces can move to e5, blocking the Pawn on e4, without risking capture by the Pawn on d4. In the same way, the Pawn on e4 guards d5. The two Pawns cover and complement each other.
The pawn structure determines how well the Pawns work together. In this diagram, which is a copy of the previous diagram, the c5 and f5 squares are marked in green. They represent strong squares for White, but weak squares for Black. White's pieces can move to c5 and f5 without the slightest worry that they will be attacked by a Black Pawn. Both of these squares would be ideal for a White Knight or a White Bishop. The corresponding squares on the White side of the board -- c4 and f4 -- represent no particular danger for White. If a Black piece threatens to move to c4 with strong effect, White plays b2-b3, protecting the square. Black also has weak squares on a5 and h5. These are less important because they are further from the center, but they would require constant attention during a game if White started to invade the Black position via one of these squares. Strong and weak squares are not determined only by the pawn structure. In the initial position, before either player has made the first move, White has a weak square at f2 and Black has a weak square at f7. These squares are weak because they are protected only by the King, who is not a fierce fighter until the later stages of the game. King safety - middle game vs. endgameThat brings us to another positional factor. The role of the King changes as the pieces disappear from the board. Consider the following diagram from a real game.
The preceding moves were 13.Bxh7+ Kxh7, where White sacrificed a Bishop on d3 for a Pawn. The Black King seems to be in no particular danger, but within a few moves every White piece -- including the two Rooks -- was attacking squares around the King. Black was unable to cope with the numerous threats and lost the game.
This is the same position, where all of the matching White and Black pieces have been removed. The Black King is in no danger and Black will win easily, probably by capturing the White Pawn on a4 with the Knight, advancing the Black Pawn from a7 to a1, and promoting the Pawn to a Queen. While this is going on, the Black King will halt the advance of the g- and h-Pawns to the 8th rank. When there are many pieces on the board, particularly the major pieces, the King is weak. When there are few pieces on the board, the King is strong. In summaryA good position is one where:-
A bad position is one where:-
In a game between masters, an advantage in any one of these factors can be enough to win the game.
|